Monday, 8 March 2010

Guide: Making A Digital Polaroid

I decided to give the Men's fashion print a bit of a funky look, so I made the pictures into digitally created Polaroid pictures, totally using information I'd collected myself. This is a guide to creating them, my way!
  • Open the image you want in the Polaroid frame.
  • Get rid of any blemishes, scratches using the clone or spot-healing tool.
  • Make any contrast / saturation changes if you want to make the picture look like a Polaroid
  • When done, use the Selection tool and while holding the Shift key, drag a square around the part of the picture you want in the Polaroid.
  • Go to Selection > Modify > Feather, Radius 5
  • Go to Edit > Copy
  • Click File > New > Size 8.8 x 10.8cm
  • Click Edit > Paste
  • Move the new layer so the border around the top and 2 sides are equal, with a bigger space underneath.
That's pretty much it, unless you have a white background in your picture, in which case go to the Blending Options on that layer and add a small line around it using the Stroke tool.

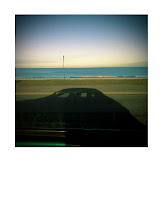
Here is one I just did, using this method:

Guide: Layers

This walk-through demonstrates how I achieved the different layers to get the shoe print.

• Open image
• Get rid of any blemishes / scratches using the clone or spot-healing tool

For this particular print I decided to use a white background to put all the layers into, but decided to use a peach background around the different segments of shoe, so they would stand out. I set the background colour to peach using the dropper tool, and then erased the shadows and highlights around the shoe, so the background showed through.

• Use the Selection tool to select the parts of the image you like.
• Click Edit > Copy
• Click File > New and set the dimensions to 29.7cm x 42 (A3) with a white background
• Click Edit > Paste, then move the new layer to where you want it. If you need to move it again, either press the small arrow icon at the top of the tools pallet or press CTRL and T (or Command and T if on a Mac)
• Do this with all the different pictures you want to layer into the print
• If you want to move 2 or more layers together, use the little lock symbol next to the layers in the pallet. This chains them together and moves them simultaneously.

If you wish to add a shadow to the layers to make them stand out from the background, simply double click on the layer to open the Blending Options, and check the box Drop Shadow. Click on the title, and you can make changes to the size, spread, angle etc.

Pasting different layers into an image is very easy, the hardest part is getting the right parts in the right place. After much work though, it does look effective.
Guide: Selective Colouring

This is a step-by-step guide on how to get different tonal effects in the pictures you take, using Photoshop’s Selective Colour tool. I used this particular tool in the Polaroid shots of Andy. It is good for adding colour to black and white pictures, but is also good to give colourful pictures a slightly different mood.

• Open your image
• Get rid of any imperfections using the clone or spot-healing tool.
• Click Image > Adjustments > Selective Colour
• Where it says “Colours”, click the drop down arrow and you will get a list of different colours. Whichever color you wish to change in your picture can be selected from this drop down selection.

If you have trouble deciding on what look you’re wanting, just try moving the sliders on different colours and experimenting first. It helps writing down what you did though, so you can achieve the same look again without too much trouble.

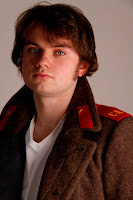
I chose this picture to demonstrate the different kinds of effects you can achieve.

Original:

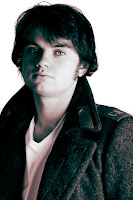
Desaturated then set to Whites > Cyan -33 > Neutrals > Cyan +8, Yellow +9 to achieve this:


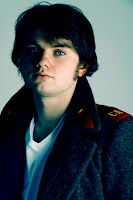
Kept the colour, but used Selective colour to pick out the blues and cyans, then made the black parts really dark to achieve this:


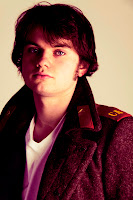
Again, kept the colour, but increased the Whites to make them more yellow, then added magenta to the neutrals to get this:


Mostly, Selective Colour is trial and error, but the above examples give you an idea of what kind of effects you can achieve with the tool.