I wanted to do some tests of cakes, so I know how to set up the lights for when I do the more expensive foods, like oysters. Andy brought in some toys he wanted to do tests of, but when we got into college, we found we actually had a lesson! Best laid plans and all that...
Anyway, today we went into the studio and found a set all ready set up; a green paper roll against a wall provided a colourful backdrop, 2 lights on tripods and the Hasselblad and Mac set up in front. He explained that using a big soft box gives you no freedom, light wise. The light cannot be moved away from the diffuser, nor does it cover the whole diffuser in even light. By attaching a screen to a tripod, lights can be put behind it, moved backwards, forwards, can be tilted etc, etc. There is so much more freedom. So, the lesson started with us all putting one up (very successful, no problems at all.)
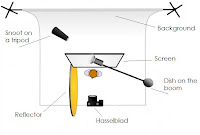
We then ended up taking portraits of each other. A stool was set down in front of a paper roll stand. A white box with a black piece of fabric over it was placed in front of the stool, so the models had something to lean on. The boom was set up with a dish on it, and was set shining down on to the model from above, through a screen set on 2 tripods, one each side of the stool. A pink piece of fabric was thrown over the paper stand (later on the green paper roll made a re-appearance) and Andy sat in front of it so we could take his picture.
Here is the lighting diagram:

We did end up putting in a hair light behind the model (the snoot) and we started with a light behind the pink fabric we draped over, but took it out when we used the paper. We took the strip light off its stand a laid it on the floor, tilted up at the background so the light hitting it would be graduated.
I wish I had an example to show, but I didn't actually take any pictures, so it would be wrong of me to include them. However, I am learning that using one or two lights are usually enough to experiment with; I've learnt that screens are awesome to use instead of light boxes, as the light onto it can be controlled far easier, and I've learnt that colourful paper rolls on stands are soooooo much better than plain white or plain black backgrounds. Would have liked to have known how easy it is to put them up earlier!
Almost forgot, we have decided to book out a small studio space on Tuesday morning for our food / toy shots. Very looking forward to it actually, I just need to buy more cakes :P
More research coming.

