Monday 10 May 2010

Retouching Eyes in Photoshop

I think the key to a fantastic portrait lies with the eyes. They really need to capture the viewer and draw them into the picture in my opinion, and a little bit of Photoshop can go along way to making eyes pop. Here is a small tutorial to describe my way of doing it.
  • Use a soft edged brush for this.
  • Start with the Dodge tool set on highlights (around 15% opacity) to lighten the whites of the eyes (usually after any other retouching to skin etc) and the catch light in them if there is one.
  • Use the Burn tool set to midtones (around 15%) to darken the pupil.
  • Go back to the Dodge tool and set it to midtones (15%) and lighten the iris.
  • Finally, use the Burn tool again (15%) set to midtones to darken around the outside of the eye. The brush size should be quite small, and try to keep just inside the eye so as not to make the whites outside darker.
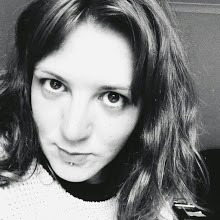
And there you have it, eyes that pop. Here is an example of before and after of my mum's eyes.

Friday 7 May 2010

Model's Needs from a Photoshoot

As a photographer I know which shots looks good and I know exactly what I want in a shot for my portfolio. Friends and family get roped in to my shoots, but are not that bothered about getting a print themselves. However, I asked people I have used in my shots what is important to them in a portrait. I asked the question on Facebook, so I could get a range of people's opinions quickly.

The question I asked was "Friends and family alike, please answer this!! What are the most important things you look for in a good, professional portrait of yourself?" and I got 9 responses.

A fellow photographer said she looked for good editing, models I've used in the past said good colour, making sure the model has good skin even if she/he doesn't, and someone else said a flattering pose. A friend's mum wanted a portrait that made her look younger and slimmer, yet someone else said that confidence and a connection between the model and photographer was important to them.

This is very interesting because when I take a picture my highest priority is good lighting, professional equipment to take the picture and making the model feel comfortable. I do understand retouching is needed to be done after, but I did not realise it was so important to the model. This is key information that I will bare in mind when retouching pictures in the future.

Gritty Portrait Tutorial

I decided to take a book out of the library,"The Adobe Photoshop Lightroom 2 Book for Digital Photographers" to get some ideas for portrait effects. The online tutorial is shown on Scott Kelby's blog.

I came across a tutorial which makes the portrait look very dark and moody, with all the highlights and details extremely defined. It was very helpful using this tutorial, as I do not usually use Lightroom for retouching; I tend to use layers in Photoshop. It very easy to do and I would definitely use the technique again. I changed my picture to black and white though because I think the effect for this picture just works so much better than if it had been left in colour.

The effect he used produced this picture:


I decided to try this on a photograph I'd taken of Andy, outside the church in Hartlepool.
The original is shown on the left, the gritty effect applied on the right. I think this effect looks really really good, though I do understand that it will only work on certain portraits. I shall be using the image on the right as one of my final prints.


Thursday 6 May 2010

Desaturation Example

After seeing the picture from The Photo Forum, I decided to try desaturated colour myself.
I opened my chosen picture, got rid of any blemishes using the clone stamp / healing tool, softened skin using surface blur (tutorial on this later), and corrected the white balance. Seeing as multiple layers were used, I flattened the image before doing anything else.

I upped the brightness and contrast to start with seeing as my picture was rather dark. I then clicked:

Image > Adjustments > Hue and Saturation

Moving the Saturation slider all the way to the right makes the colours very very vibrant. If a bright colourful picture is what you want, move the slider to around +25.
However, I wanted desaturated colour so I moved the slider to the left. All the way left makes the picture go black and white, so I stopped around the -75 mark to give just a hint of colour. I then used the brightness and contrast tool again and got the final image.
Below is the original image, a desaturated image and a pure black and white image.
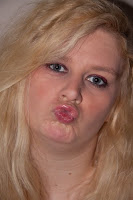
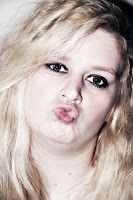
Desaturation

In earlier posts I have said that because I already have a lot of black and white portraits under my belt, I wanted coloured prints. Split toning is a good way to add colour to a black and white image, as I have shown using the picture of Lucy. Another way of adding slight colour is to keep the photograph colour, but move the "Saturation" slider down in Photoshop. Not all the way down as this would make it black and white, but slightly down so the colours are rather muted. This is an example taken from The Photo Forum. Someone wanted to know what a specific camera could do, and the girl who took this explained that only a bit of slight desaturation and a cool white balance was used. I want to try this in a few of my pictures to see what effect it gives.

Sunday 2 May 2010

Textures

After looking at Lara Jade's work, I have noticed that she uses a lot of stock textures overlaid over the picture to give it more depth. These include light spots, scratches and paint splodges. It is a hard thing to incorporate in to imagery but it makes the end print really exceptional. They can be used both in colour and monochrome, though care is needed when using blending modes as the colours can sometimes clash with the original picture.
Digital Photography School offers a very detailed and precise tutorial on how to use textures over a picture, though it does say techniques and blending modes depend on both the picture and the texture you are using. I used the tutorial and the end effects produced this:


I think using textures suits some pictures but not others, and I do not think it helps this picture in the slightest. However, this tutorial is something to keep in mind for the future, if I ever want to try textures again.

Split Toning

I used the step by step guide on split toning from Tutorial Pulse to create the picture below. This was a very natural pose by my friend Lucy against the brick wall of her house. I changed it to monochrome and added purple highlights with blue shadows. I think this works really well as it gives the black and white portrait colour, without being too contrasty. I might not use this technique for all the pictures for this project, but I will certainly experiment with different colours on different pictures.